How to Know Which Shots to Use for My Storyboard
Depends on what you want the audience to feel.
The ultimate power in filmmaking and cinematography is how shots and camera movement are able to affect us subconsciously. They can steer us toward reactions or understandings without us being aware it’s happening. Films of all genres, including documentaries, manipulate audience’s emotions through shot, camera movement and editing choices. Manipulating emotions when done with the purpose of entertaining and heightening the drama in the telling of a story, is not considered propaganda …but today there are projects making it harder to tell the difference. Especially when using innovative technical elements as used in Academy Award nominated film VICE written and directed by Adam McKay.
Camera moves, shot choices are most effective when they work in concert with the story to amplify the narrative and sometimes surprise the viewer. Knowing the various camera moves, shots, angles, perspective techniques –and their implied meaning – will give you choices about how you can communicate your project’s story or message. A great reason to storyboard and plan shots.
Basic Camera Movement and Motivations
By incorporating a variety of different camera movement into your shots, you can spice up your finished production. As with deciding how to frame your shots, take care when selecting the most appropriate camera move. The effect that each movement has can vary significantly in how it makes the viewer feel. Let’s take a look at some basic camera movement to understand what effect it will have on your viewer; how to use them and how to communicate camera or actor movement within a storyboard frame.
Zoom
Probably the most well-known camera move, zooming gives the impression of moving closer or further away from the subject. It’s used effectively to magnify a certain focus point in the frame. A move such as a dolly, is a more natural way to show movement. While a quick zoom can help add a sense of drama and energy when used correctly, avoid over-using zoom as your default move. Zoom vs. Dolly = Magnification vs. Movement.
For technical info on the difference between a digital zoom and an optical zoom you can read about it on Digicam Help .
Pan
Panning is when the camera swivels horizontally from a fixed position. This is a rotating movement in which the camera’s position remains in place, but the direction that it faces changes. Look to your left, then look to your right – that’s panning. It can be used to follow a moving character or to fit more into a frame, for example, panning across a landscape to create a sense of place or to make a reveal. Here’s a fun article (with examples) on the use of Pan & Dolly shots written by Justin Morrow @ No Film School.
Tilt
Tilting is similar to panning in that the camera is kept in a stationary position, but unlike panning (which looks from side to side) tilting focuses on upwards & downwards movements. Using a tilting motion helps to fit more into a single frame. A slow upwards tilt can be very effective in making a subject appear bigger or more significant while a downwards tilt has the opposite effect.
Dolly
A dolly shot is when the entire camera is mounted on a track and is moved towards or away from a subject. Unlike a zoom shot, the world around the subject moves with the camera. A dolly gives the illusion that the viewer is walking towards the subject and can be a great way of creating a sense of intimacy between them. It’s also a great camera movement for a reveal of a plot point.
Truck
Similar to dollying, trucking (or tracking) involves moving the entire camera along a fixed point, but the motion goes horizontally, from side to side, rather than in and out. It’s often used to follow characters who are in action. For a deeper look at Tracking, Trucking and Dolly shots visit Fatcat Film Club.
Boom/Jib
A boom/jib/crane (a/k/a Pedestal) involves camera movement upwards or downwards in relation to a subject. It’s different from tilting in that the entire camera ascends or descends, rather than just the angle of the camera. A pedestal shot can be used to frame a tall or high subject (such as a building) while keeping the framing at eye level view for the viewer.
Storyboard Shots
There are an infinite number of ways to frame a subject within a shot without camera movement. Meaning, let the character action/movement play out in a static (locked down) camera shot. The important trick is to keep in mind the message you want to communicate with each shot choice.
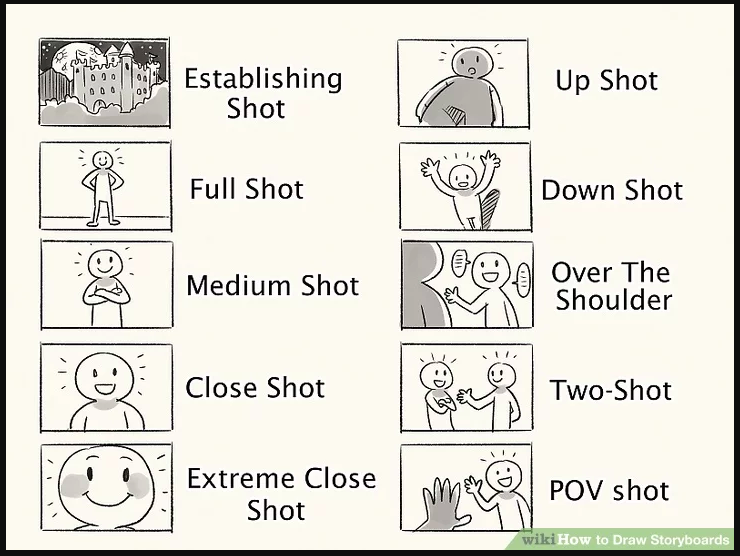
Image courtesy of wikiHow
Shots range in size from showing a subject’s entire body to focusing on a small detail. By planning the camera shots prior to production, you can heighten your message by refining or recomposing the shot.
Storyboarding with powerful storyboard software gives you the tools and built-in artwork to compose a shot and refine the elements and boards as the storyboarding process progresses. But if you’re skilled with a pen and have plenty of paper, there’s always storyboard templates to start your journey.
If you’re looking for where to start your storyboards or simply how to create a storyboard from a script, check out our blog post on that subject. Here are some of the most common types of shots used and how you can go about maximizing their effect:
Establishing Shot
An establishing shot helps “establish” and orient a viewer in time and space. This camera shot is often included at the beginning of a scene. It builds ambiance and context of what’s to come. It’s generally a long shot to indicates where and when the scene is taking place. Of course there are always exceptions to opening shots.
Full Shot/Long Shot
The full shot (a/k/a long shot) shows the entire body of the subject from head to toe. This shot tends to focus more on the character’s physical movement and gestures, rather than their state of mind. It keeps your audience at a safe distance and can be used to relieve tension.
Medium Shot
The medium shot (MS) typically shows a subject from approximately the thigh/waist up. It allows the viewer to see the background environment and a character’s gestures, while still being close enough to capture their emotions. A medium shot is often used as a reaction shot to show the audience what the character is thinking about the action that occurred in previous shot. It can also give the audience a clue about how they should feel about what is happening.
Close Up Shot
With a close up shot (CU), the subject’s head/face takes up the majority of the frame. This intimate positioning between camera and subject allows reactions and emotions to dictate the shot.
The prominent focus on the subject directs the viewer’s eyes, and builds a personal connection with the subject without the distraction of the background or surrounding activity. Close ups are also used as reaction shots to heighten tension or provide a characters “reaction” to an event.
Extreme Close Up Shot
An extreme close up shot (ECU) is used to call attention to a specific detail. It can be effective at adding drama or highlight a clue within a scene. It allows the viewer to see details that may have otherwise gone unnoticed or can accentuate the emotions a subject is experiencing.
Hero Shot
An Hero shot (aka:Up shot or low angle) is taken from below the eye-level of the subject. It creates the perception of looking up at the subject from below. This type of shot contributes to the impression that the subject is in charge. This can mean subject is powerful, dangerous or heroic (hence the name).
Down Shot
A Down shot (a/k/a High Angle), in contrast to a low angle shot, is taken from above eye-level of the subject. This camera shot can make the subject seem vulnerable or powerless. Can be used to imply that a person is depressed or in a crisis.For additional information and examples about the high angle shot you can read an article on High Angle Shots in Hitchcock’s Movies on the Alfred Hitchcock film site.
Over the Shoulder Camera Shot
This type of shot is taken from behind the shoulder of another character. It typically frames the subject in a medium or close up shot. It is particularly effective in group conversation scenes and to help establish which characters are speaking to each other.
Two Shot
A Two shot presents two characters together within the same frame. It’s a way of highlighting two people and can be used to give relevant information about their relationship. Variations of the two shot can be used to deliver deeper messages about the characters. For example, when characters are positioned next to each other, it implies that they have equal importance within the scene.
Point of View Camera Shots/ POV
The Point of view shot (a/k/a POV) depicts a shot that shows what a character is looking at. This allows the viewer to take on the perspective of the character. It’s used when you want to your viewer to understand what a character is thinking or observing.
Dutch Angle/Tilt
Dutch angle or Tilt shot (a/k/a German, oblique, or Batman angle) is a shot taken when the camera set at an angle. (i.e. the horizon line is not level). Dutch angle shot implies a disoriented or uneasy psychological state of mind. The shot is jarring by design. It’s a device that has traditionally come with a label reading: “WARNING: use with caution.” For an interesting history on this “impossible to ignore” shot, visit MSDWN.com
Bird’s-Eye View (aka Top Shot)
A Bird’s eye view is a high-angle shot taken from directly overhead and from a distance. The shot gives the audience a wider view and is useful for showing that the subject is moving. It can highlight special relations, or reveal elements outside the boundaries of the subject’s awareness. The shot is often taken from on a crane or helicopter.
Finally, if you’re interested in knowing more about cinematography, filmmaking and the newest equipment trends in production, check out ICG (International Cinematographers Guild) Magazine)
Meet the Author, Sally Walsh
Sally A. Walsh is a screenwriter, producer and co-founder of PowerProduction Software, creators of the first digital storyboarding application StoryBoard Quick, https://www.powerproduction.com/.


