Building Flats: Step-by-Step Guide
TCT has built a variety of flats over the years, and we've used a variety of materials in doing so.
There's no one "perfect dimension" that we've discovered, but we're using what has become our standard size flat -- 11 feet high by 4 feet wide -- for this "how-to". This height, in several widths, but mainly four feet, seems to work best for our productions. However, we've also used 8, 14 and 16 foot flats over the years and you should experiment and adopt whatever size works best for your needs and space.
The flat we'll talk about building here has a muslin covering, but we've also used 1/8 inch veneer with some success. The advantage of plywood veneer is that it's easy to work with, sturdy and, if you're going to build a standard 4x8 flat, you don't have to worry about cutting and fitting to the frame. In fact, you can use the "factory edge" of the plywood sheet to square-up your frame. The disadvantages of plywood are more weight, a surface that tends to bounce light more and, if you're building taller flats, a seam that has to be dealt with (usually by covering it with gaffer's tape or a strip of muslin glued across the seam).
The advantages to muslin are that it is light-weight, cheap (when bought in bulk), and has a very nice finished surface that tends to absorb stage-lighting more. Disadvantages are that it can tear (but, on the other hand it mends nicely), and that -- until you get the knack of it -- it can be hard to work with in building flats.
Most of the materials you'll need can be found at your local hardware store. The same can be said for the tools you'll need (although you may have trouble affording or borrowing a table saw with a dado blade -- we offer an alternative to this problem, however). Muslin is the only item you may not be able to find locally. We order ours, in bulk, from Theatrical Lighting Systems, Inc. in Huntsville, Alabama. You should be able to buy your material through your own theatrical supply dealer.
Now, let's get building…
Joining the Pieces - Dado Joint
The first step in building your flat is to construct the frame. Our bill of materials calls for 1x2's. You can use 2x2's, but we've found these to be heavier than needed and don't use them except in limited circumstances where we need a particularly sturdy piece. Also, our bill of materials specs lumber that is pre-cut for length; obviously, your first step will be to cut standard size pieces to your own specifications.
We've specified clear pine 1x2's. The main thing is to use high quality, light weight wood that is straight! This can't be overemphasized. When you're working with flats that are even eight feet high, bending and warping are extremely noticeable, particularly under stage-lighting.
After you've cut your frame pieces, you'll need to fit them together. We highly recommend that you do this with dado cuts. Mark your vertical pieces at top and bottom and at appropriate spots for the interior cross-pieces (we use three feet from top and bottom in this example). Make dado cuts that are just wide enough to accomodate the 1x2 cross-pieces (1 and 9/16 inches) and set your blade to cut deep enough to "match" the corresponding cut in the cross-piece (3/8 inch). Experiment with some scrap pieces first.
Once you've made all your dado cuts (both vertical and cross-pieces) lay them out on a flat surface and use a carpenters square to align your frame. You should be able to simply glue the pieces together, although some folks add a screw at each joint (remember to drill a pilot hole to avoid splitting if you do this). Let the glue dry (preferably overnight) before attempting to apply the covering.
Using Gussets
We recommend using dado joints for building flats. This allows for a nice "fitted" frame that is easy to use, easy to fit together with other flats, easy to transport and easy to store. Another advantage is that you can use your dado cuts to help square up the frame. Finally, dado cuts allow you to construct a frame that can be covered on both sides. We use double-sided flats in a number of our productions. For instance you can mount the flats on a low boat truck or (if you're lucky enough to have one) a revolving stage and simplify set changes.
However, there is a work-around if you don't have a table saw equipped with a dado blade (or a router table -- which is an alternative). Remember the scrap pieces of plywood veneer we mentioned in our bill of materials? Use these to make "gussets". These bracing pieces can be rectangular, but we recommend using a triangular shape because you don't end up with corners just waiting to snag a passing costume. Butt the cross-piece against the vertical piece at right angles (again, using your carpenter's square), and then glue and screw a gusset in place to hold the two pieces together (see diagram). CAUTION -- remember to trim your 48 inch cross-pieces to allow 45 inches to allow for the butt joint versus the fitted dado joint. Also, remember to use pilot holes before screwing the gussets in place.
The Frame
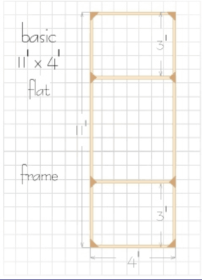
Your finished frame (with gussets) should resemble the scale drawing at left. Because we're using gussets, and don't intend to make a double-sided flat, this is the "back" of your frame. We use gussets for strengthening the joints on frames that have fitted dado joints unless we intend to cover both sides of the flat. We also use gussets (both rectangular and triangular) for "splicing" flats together to make a "wall" in a box set. This helps create a straight line for walls and serves to strengthen and stiffen the wall (remember, actors love to slam doors). For angles, corners, and "book flats", however, you'll want to use hinges.
The placing of the interior cross-pieces is somewhat arbitrary. You can space them to divide the flat in thirds, but three feet from either end is an easy measurement to make and remember. The main thing is to space them far enough apart to provide the support you need. Obviously, flats that are taller than eleven feet will be sturdier if you use three interior cross-pieces instead of one.
While we're on the subject of cross-pieces, an additional cross-piece can be added temporarily to provide backing for nails, screws or whatever that you might need for hanging pictures or other set dressing on the finished side of the flat. For lightweight objects you can simply use a piece of 1/4 inch plywood for this backing.
The Muslin Cover
Now comes the hard part. Covering the frame with muslin. First, trace a small bead of wood glue along the surface of all the pieces of the "front" of your frame. Use a two inch paintbrush to smooth and spread the bead of glue evenly over the surface of the frame.
Now (and this is a two -- or even three -- person job) stretch out the muslin at the bottom of the frame (just designate one end the bottom, the other the top). The idea here is to slowly "flip" the muslin over as you proceed from bottom to top of the frame: just like slowly pulling a sheet up and over a bed. You may want to apply the glue to the frame as you go, so that it won't dry out during this process. Just start at the bottom rail of the frame -- spread the muslin along this edge, spreading and pushing to remove any wrinkles, but not stretching the muslin too tightly. Continue to slowly flip the muslin and apply it to the vertical pieces and cross-pieces as you work your way up the frame. Again, keep out the "major" wrinkles, and pull the muslin evenly across the frame as you go.
The reason to avoid too much tension in the muslin covering, while keeping the covering even and smooth, is to avoid a surface that "sags", but not get it so tight that -- when you paint it -- the muslin shrinks and causes the frame to "bow". Keep in mind that this is unbleached muslin and it will shrink when you apply the first coat of paint or primer to it. This is the "hard" part we've been talking about. But, once you get the hang of it, you'll find that it becomes much easier.
After you've evenly spread the muslin over the glued frame surface, you can (optionally) staple the muslin to the frame using a staple gun and 1/4 inch staples. Finally, we usually add a bit of water to our wood glue (just a very small amount will do) and brush this mixture over the muslin covered frame pieces to insure a permanent bond.
Allow the glue to dry (again, preferably overnight) and then trim the overlapping muslin to the frame (see diagram) to finish the flat. Apply a coat of paint or primer and allow this to dry completely. This is the acid test. Hopefully, the muslin will shrink just enough to form a perfectly smooth surface for use in your productions. If there are sags, you didn't get enough tension in the muslin when you stretched it over the frame. If the frame bows, or if the muslin has torn away from the glued surfaces, then you applied too much tension. If either of these unwanted events occur, don't despair: you can usually get it right on the second try, if not the first.
Using Bracejacks
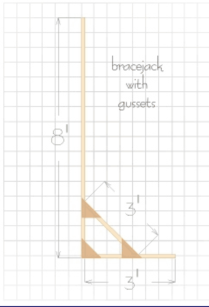
One more thing -- and this doesn't relate directly to the construction of flats. Now that you have a completed flat, you'll want to begin using it in productions. They're particularly well suited to use in "box-sets". There are many ways to stand flats up for use on your stage, but one of the simplest and easiest to use is the "brace-jack" (see diagram at left).
We build brace-jacks in all sizes from six feet to ten feet high. We usually buid them out of 2x2 pine, but the main consideration is straight and lightweight, while sturdy enough to serve as a brace for the flat. No dado joints or anything fancy here. Cut two straight pieces to the desired lenght, and then use a miter saw to to cut a piece with 45 degree opposing ends to fit as the "brace" connecting the vertical and horizontal pieces together. Use three inch wood screws to tie the three pieces together (making sure to get a good right angle on the vertical and horizontal joint with a carpenter's square). Glue and screw gussets made from 1/8 or 1/4 inch plywood in place to add stability and strength to the joints (see diagram).
We sometimes (when we're lazy and in a hurry) screw the flats to these brace-jacks directly (from the front of the flat to the brace). However, the better practice is to attach the brace to the flat with hinges or with one to one and a half inch angle brackets (from the back of a cross-piece to the side of the brace). We also use angle brackets to attach the bottom of the frame to the stage (although you may not want to do this on your stage. The brace itself can be weighted or can be attached to the stage for stability, and you can add even more stability to the flat wall by attaching a single, long 1x2 to the top of the flat (a hinge works nicely) and attaching this to the stage to form a "buttress" (try to keep an angle of 60 degrees or less for this to work).


