

A Beginner’s Guide to ScreenFlow
Given that many school video projects involve a lot of screen capture and recording, ideally you’ll want something that can handle the on-screen recording, editing and exporting right from within the software.
Some of the more high-end, professional grade editing suites can do all this and more, but unless you’re a dedicated film school and you’ve got around $1000 to blow on a software license, chances are you’re looking for something which gets the job done well without maxing out your school’s budget.
ScreenFlow 4 is, hands down, one of the most intuitive yet advanced video capture and production tools you can buy for under $100. In fact, the only major downside to Screenflow is that it’s currently unavailable for non-Mac users (they’ve been threatening a Windows release for a while now, but it doesn’t seem likely any time soon).
While I could wax lyrical about the virtues of ScreenFlow until the cows come home, for the purposes of this post I’m going to go ahead and assume you own a copy (or are considering picking one up) and get right into how it actually works.
There are more features to ScreenFlow than you could shake a stick at (and a lot of hidden depths to the software which you’ll no doubt discover in due course.) To get you up and running, I’ll start with the very basics:
1. Screen Capture
2. Editing Clips
3. Audio Editing
4. Transitions
So without further ado, let’s dive straight on in.
Screen Capture
When you first fire up ScreenFlow you’ll be presented with an option of what you’d like to record. If you don’t get this option for any reason, you can initiate a new screen recording at any time with the small camera icon which sits on the top right-hand side of the toolbar whenever ScreenFlow is running. Here are the options which are presented:

As you can see, it’s all fairly explanatory. The first option is for selecting which monitor you wish to record – if you don’t have a second monitor hooked up, the dropdown menu will be grayed out and it’ll display the default option (in this case, the iMac screen.)
You’ll also have the option to record from the Mac’s webcam simultaneously, which will create two separate recording streams – one of the screen, and one of your webcam. This is particularly useful for tutorial videos and you’ll be able to edit, position and scale both of the resulting videos as independent elements (which we’ll get into in a bit.)
As for the audio options, you can record both the audio coming directly from the Mac’s soundcard (so any application noises are flawlessly captured) as well as the in-built or external mic. The bar beneath this will give you a preview of your levels – if you find this maxing out and turning red, adjust the input volume through the Mac’s native settings. It’s also a good idea to wear headphones while recording if you’re picking up both the computer and mic audio, since you won’t want any speaker noise to feedback through the mic.
Tick whichever boxes apply to your project then simply hit record – you’ll get an old-time movie countdown before the recording starts, which is customizable by hitting the right arrow (again in the above screenshot).
Once you’re done, right-click the camera icon on the toolbar and hit ‘stop record’. That’ll open up the main editing suite with your newly-recorded files sitting on the right panel.
Editing Clips

At this stage you should have three main sections in front of you – the central window, which is your video ‘canvas’, the right panel which includes all of the media within the project, and the timeline on the bottom.
If you were to hit the record button again, anything captured would be dropped into the right hand panel – in this case, we’ve got a simple screen recording of the School Video News website as well as a separate file for the webcam capture.
You can drag and drop any media from your computer straight into this area and it’ll be copied into the project, be it an MP3, live video or still image. In turn, you can drag anything from here into the timeline below and once there it’ll show up in the video. You’ll see it appear in the video canvas when you hit ‘play’, which is the button just above the timeline panel.
It’s automatically added our recording to the timeline for us (since it’s the first one) and is ready for editing.
Here I’ve used the lower-left ‘zoom in’ function to make it easier to precision edit and see what’s going on. Given that I spent the first ten seconds of the recording clearing my throat, I want to cut that out of the recording – here’s how to trim and move clips around the timeline:

1) Select which clips you want to edit. When selected, the clip will be highlighted in yellow – since I wanted to cut both the screen and webcam recording together, I held shift while clicking on both.
2) You can grab the beginning (or end) of a clip and drag them to the point you want. Alternatively, you can move the play marker (indicated by the red line) wherever you please, right click any selected clip and hit ‘split clip’ and delete the newly-created segment before it.
3) This has now left an 8 second gap at the very start of the video – in the canvas, this displays as black if you set the playback anywhere within those 8 seconds because there’s nothing there to show. Since we don’t want this in the final video, I’ll move both clips back to the zero position by simply selecting them both, holding left click within the clips (either one will do) and dragging them to the left.
Note that if you trim a track, that footage isn’t lost. You can reverse the above steps to get it back, dragging the start/end points backwards and forwards as many times as you like.
You’ll notice that there is space for another clip below these two. ScreenFlow lets you add as many different ‘tracks’ as your Mac can handle – again, just put the media you need into the ‘your media’ panel and drag it in.
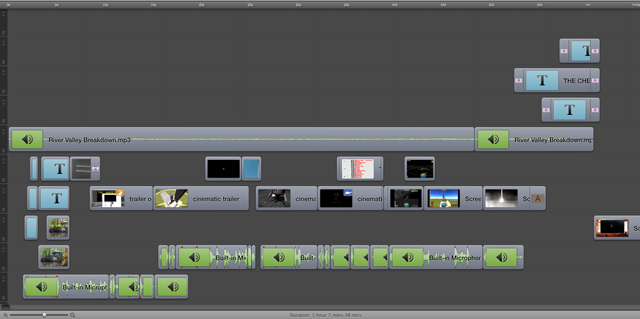
Just bear in mind that the timeline is layered, in the sense that if two video files are running together, the video canvas will show whatever is higher up on the timeline as the ‘top’ video. In our above example, you can see the webcam footage is overlaying the screen recording; if we switched them around on the timeline, you’d only be able to see the screen recording since the webcam footage would be ‘underneath’ it. This is an important consideration to make when adding text overlays, or when things get really complex as they did in one of my more recent projects:
It’s worth noting that you can rename the files in your media section too, which is handy when you’ve got a lot going on as ScreenFlow will display the file title within the timeline.
Audio Editing
While recording for this tutorial, I was purposefully yelling like a lunatic in order to get the audio levels to do this:

Obviously, this is not good. You can see straight from the wave that I’m talking at a normal rate and then suddenly get loud (it actually doesn’t take a big volume increase on an inbuilt iMac mic to do this.) If there had been any noise coming from applications running, they would have generated their own waveform in the lower screen recording track, but I was just statically recording the SVN web page at the time.
We’ll want to bring the sound levels on the loud parts down a notch (or seven.) To start with, I select just the top track and drag the play marker to the 10.5 second position, just before the sound peaks. Right click, split the track, then repeat on the other side around 14.5 seconds.
What we’re left with is a part of the track which is isolated:

As with anything in ScreenFlow, you can adjust all kinds of aspects of the selected clip via the tabs above the media pane. Here’s a shot of the tabs, with the audio properties selected (the ‘your media’ section we’ve been discussing is the one on the far right):

You can probably guess which dial we need to drop the volume level of the selected section. What’s great is that the waveform in the timeline changes in real time, so you can get a fair idea of how loud it’ll be without having to keep guessing and listening to the clip back. The filters and effects work exactly as you’d imagine, too.
As an aside, you can also add subtitles and text overlays to the video via the ‘T’ tab pictured above. That’s all pretty self-explanatory and the resulting overlays are edited in the same way as video clips, so I’ll let you play around with those at your leisure.
But anyway, editing audio is as simple as that. The only other thing to note here however is that the audio is embedded within the clip by default; by right-clicking the clip and selecting ‘detach audio’, ScreenFlow will instantly separate the audio from the video and put it on its own track.
Transitions
Want to have a seamless cross-dissolve between two different video clips, rather than a sudden stop-start? Piece of cake.
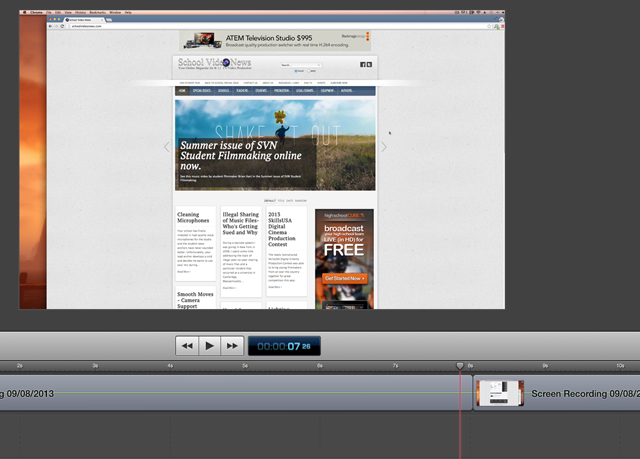
In the above screenshot, you can see two clips in the timeline. The first clip on the left is a recording of the top of the SVN website, as can be seen in the canvas pane. The second clip on the right is a recording of the bottom of the site – if I was to hit play, the play marker would pass over the split and the video would jump abruptly.
To change this, simply select on of the clips and drag it as you would normally to move it around the timeline. This time however, we want the two clips to merge; select one, and drag it into the other clip. This is what happens as you mash the two together:

It’s a bit hard to visualize through a screenshot alone, but if you try it out within the program, it’ll make sense almost instantly. The amount of crossover time depends on how much you drag them together. By default, ScreenFlow will apply a ‘page turn’ effect between the two clips, but if you right click that crossover section, you’ll get a nice selection of different effects.
This transition also works with audio-only tracks – if you merge two audio clips, the first will fade out while the other fades in.
In Closing…
So, that’s about it for the basics. I’m going to close it off here as we’re already approaching a novel-length post, but needless to say there’s a lot more to ScreenFlow than the above. Once you’ve gotten to grips with these basics, however, you’ll be already exploring a lot of the other intuitive features that you will come across naturally while poking around the software.
That all said, do feel free to hit me up in the comments below (or on G+) if you have any queries or problems in getting ScreenFlow to work for you, and I’ll be more than happy to help out where possible.
Ultimately, however, I don’t doubt for a second that you’ll become a ScreenFlow master in no time.
Best of luck, and happy editing!
Meet the Author, Zeke Iddon
Zeke Iddon is a writer by trade who primarily works as a lead consultant for the New York Film Academy (nyfa.edu), but has become incredibly passionate about video media over the past couple of years. He uploads comedy and gaming videos regularly (albeit) in an amateur capacity) to his YouTube channel – on which everything was created through Screenflow - where he also has a related Mac live streaming tutorial.